


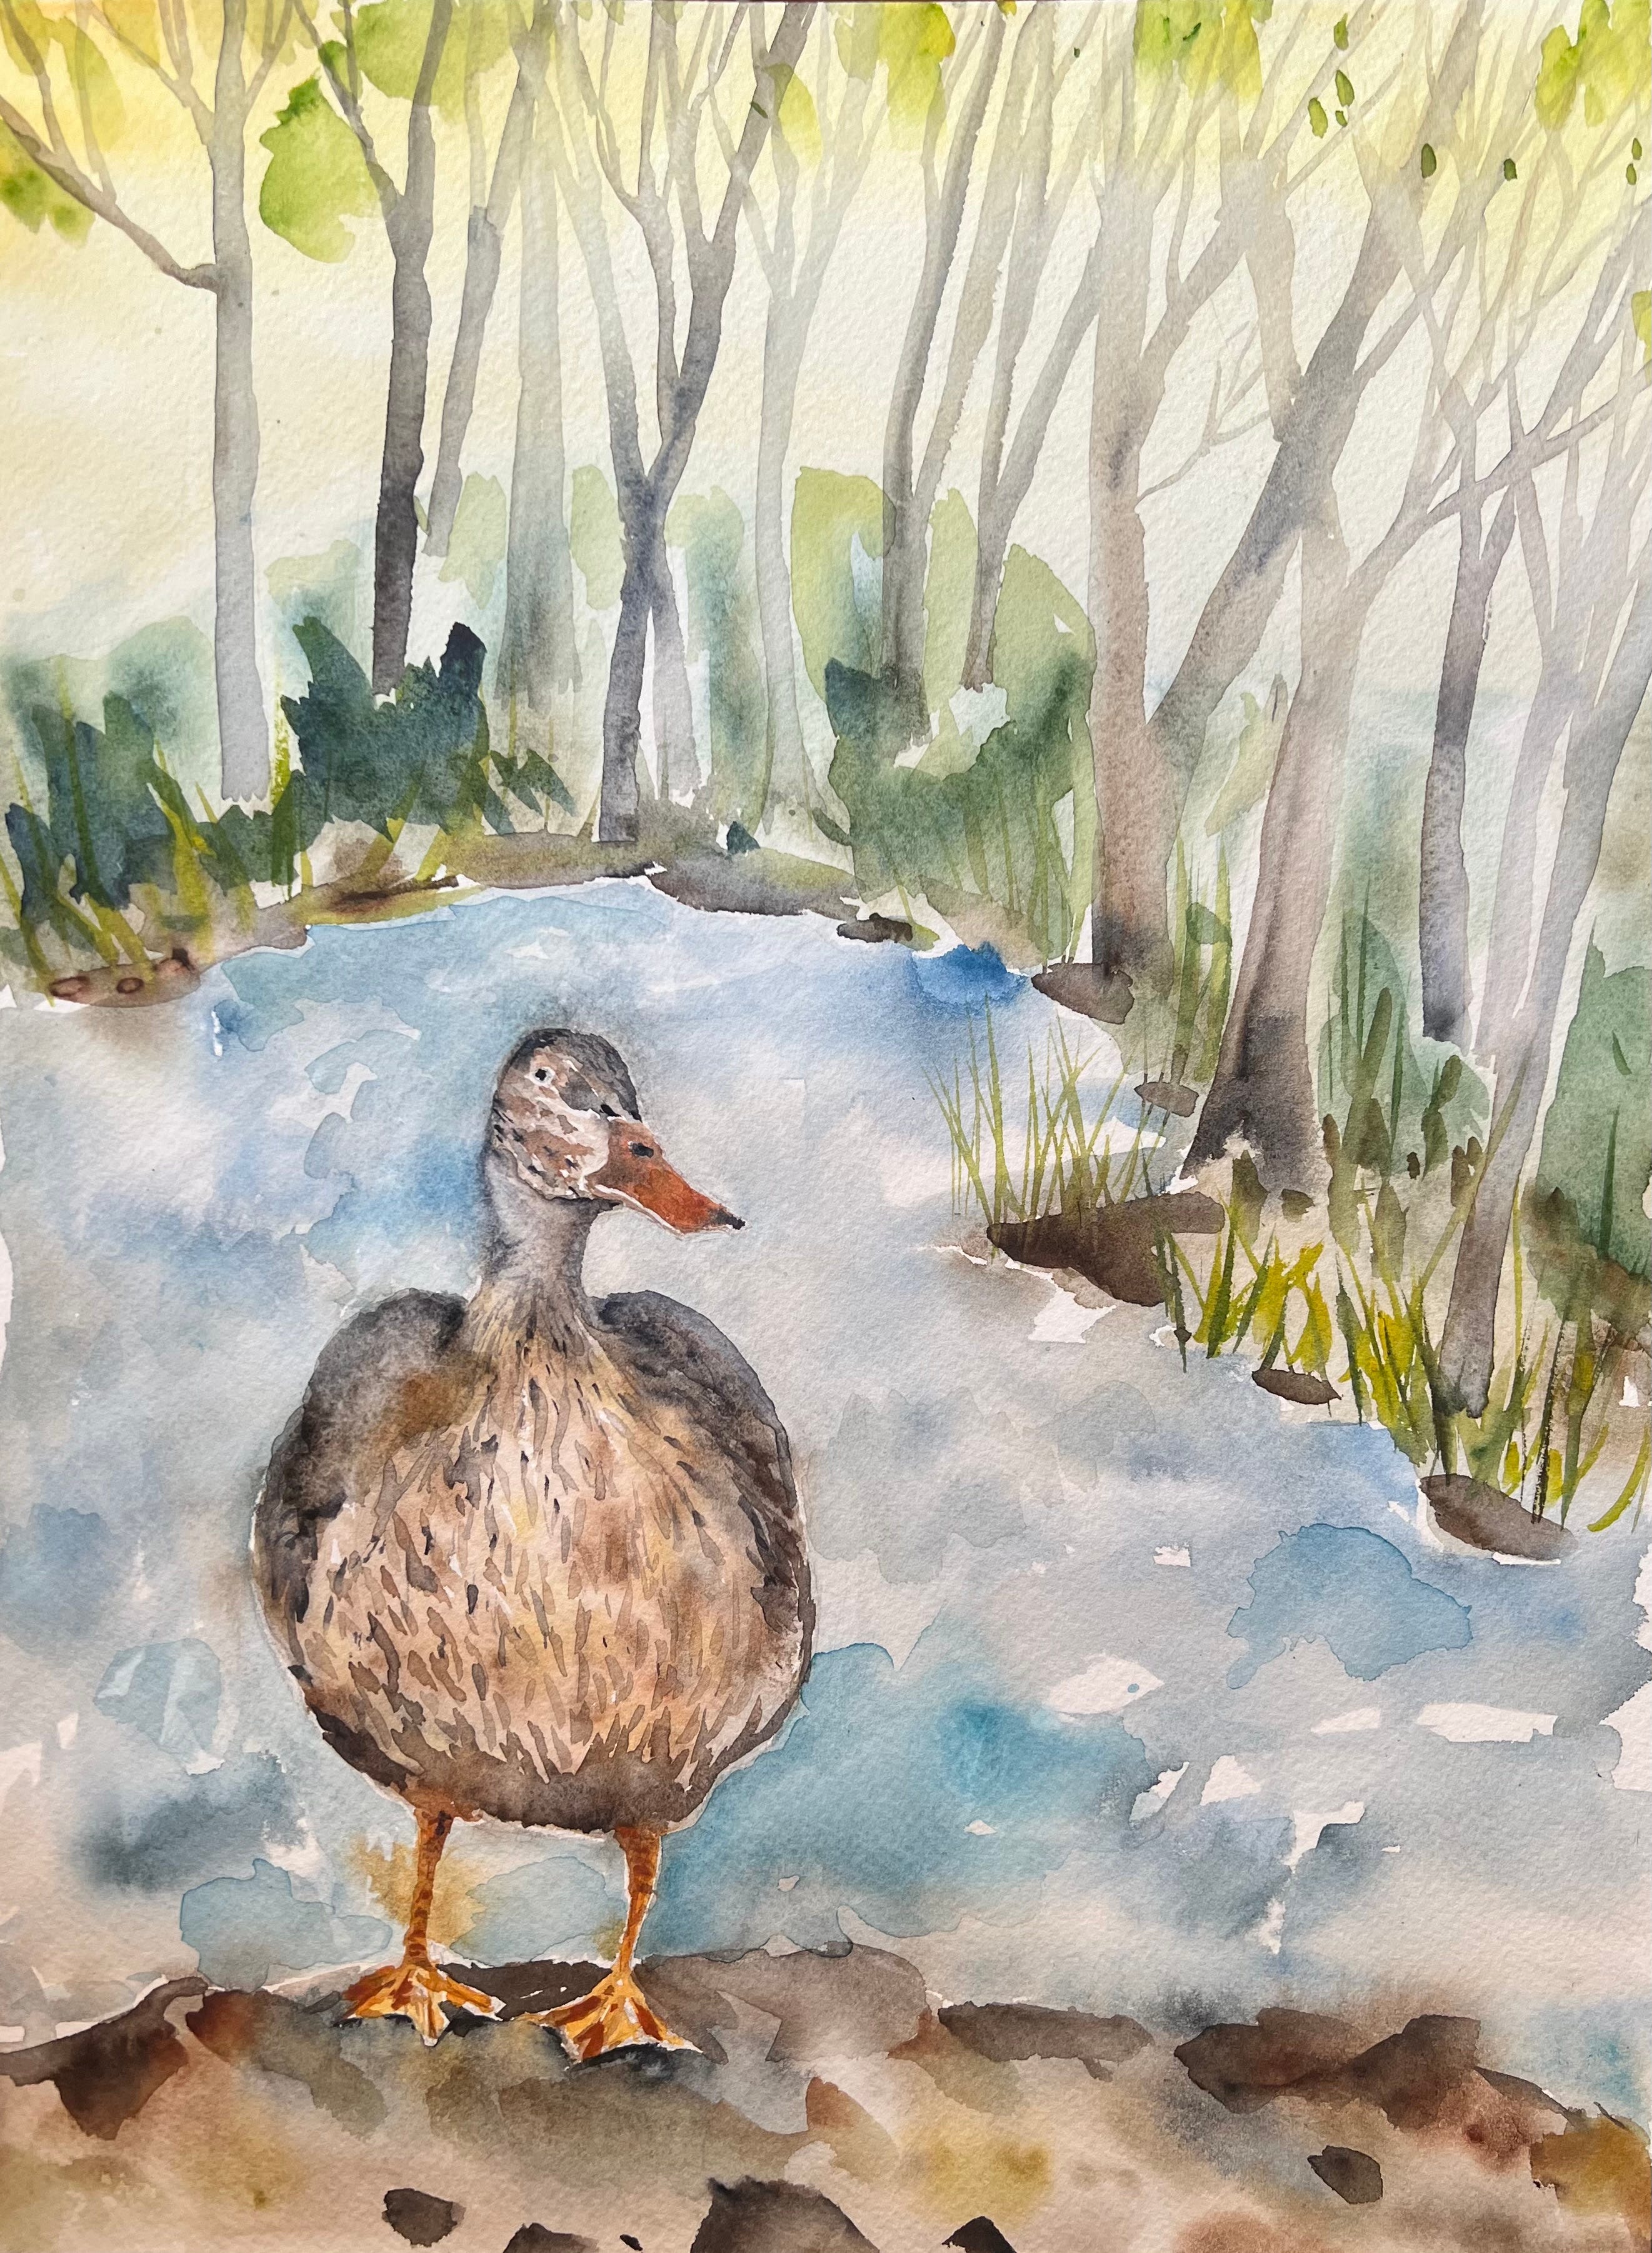
Welcome to this watercolor tutorial where we’ll paint a peaceful scene featuring a duck standing near a calm body of water, with a misty forest in the background. This project is perfect for beginners and intermediate artists alike, as we’ll focus on layering soft watercolor washes to create depth and atmosphere, while capturing the charm of the duck in the foreground. Let’s get started!
*This week is music only in the background. Please reach out with any questions! Detailed instructions are written below.
Materials You’ll Need
• Watercolor paper (cold-pressed, 140lb/300gsm is ideal for beginners)
• Watercolor paints (tubes or pans): Colors like Burnt Sienna, Raw Umber, Payne’s Gray, Sap Green, Yellow Ochre, and a touch of Orange for the beak and feet
• Brushes: A medium round brush (size 6 or 8), a small round brush (size 2 or 4) for details, and a flat brush for larger washes
• Two cups of water (one for clean water, one for rinsing)
• Paper towels or a rag for blotting
• Pencil and eraser for sketching
• Mixing palette or a white plate for mixing colors
• Optional: Masking tape to secure your paper to a board
Step-by-Step Guide
Step 1: Sketch the Composition
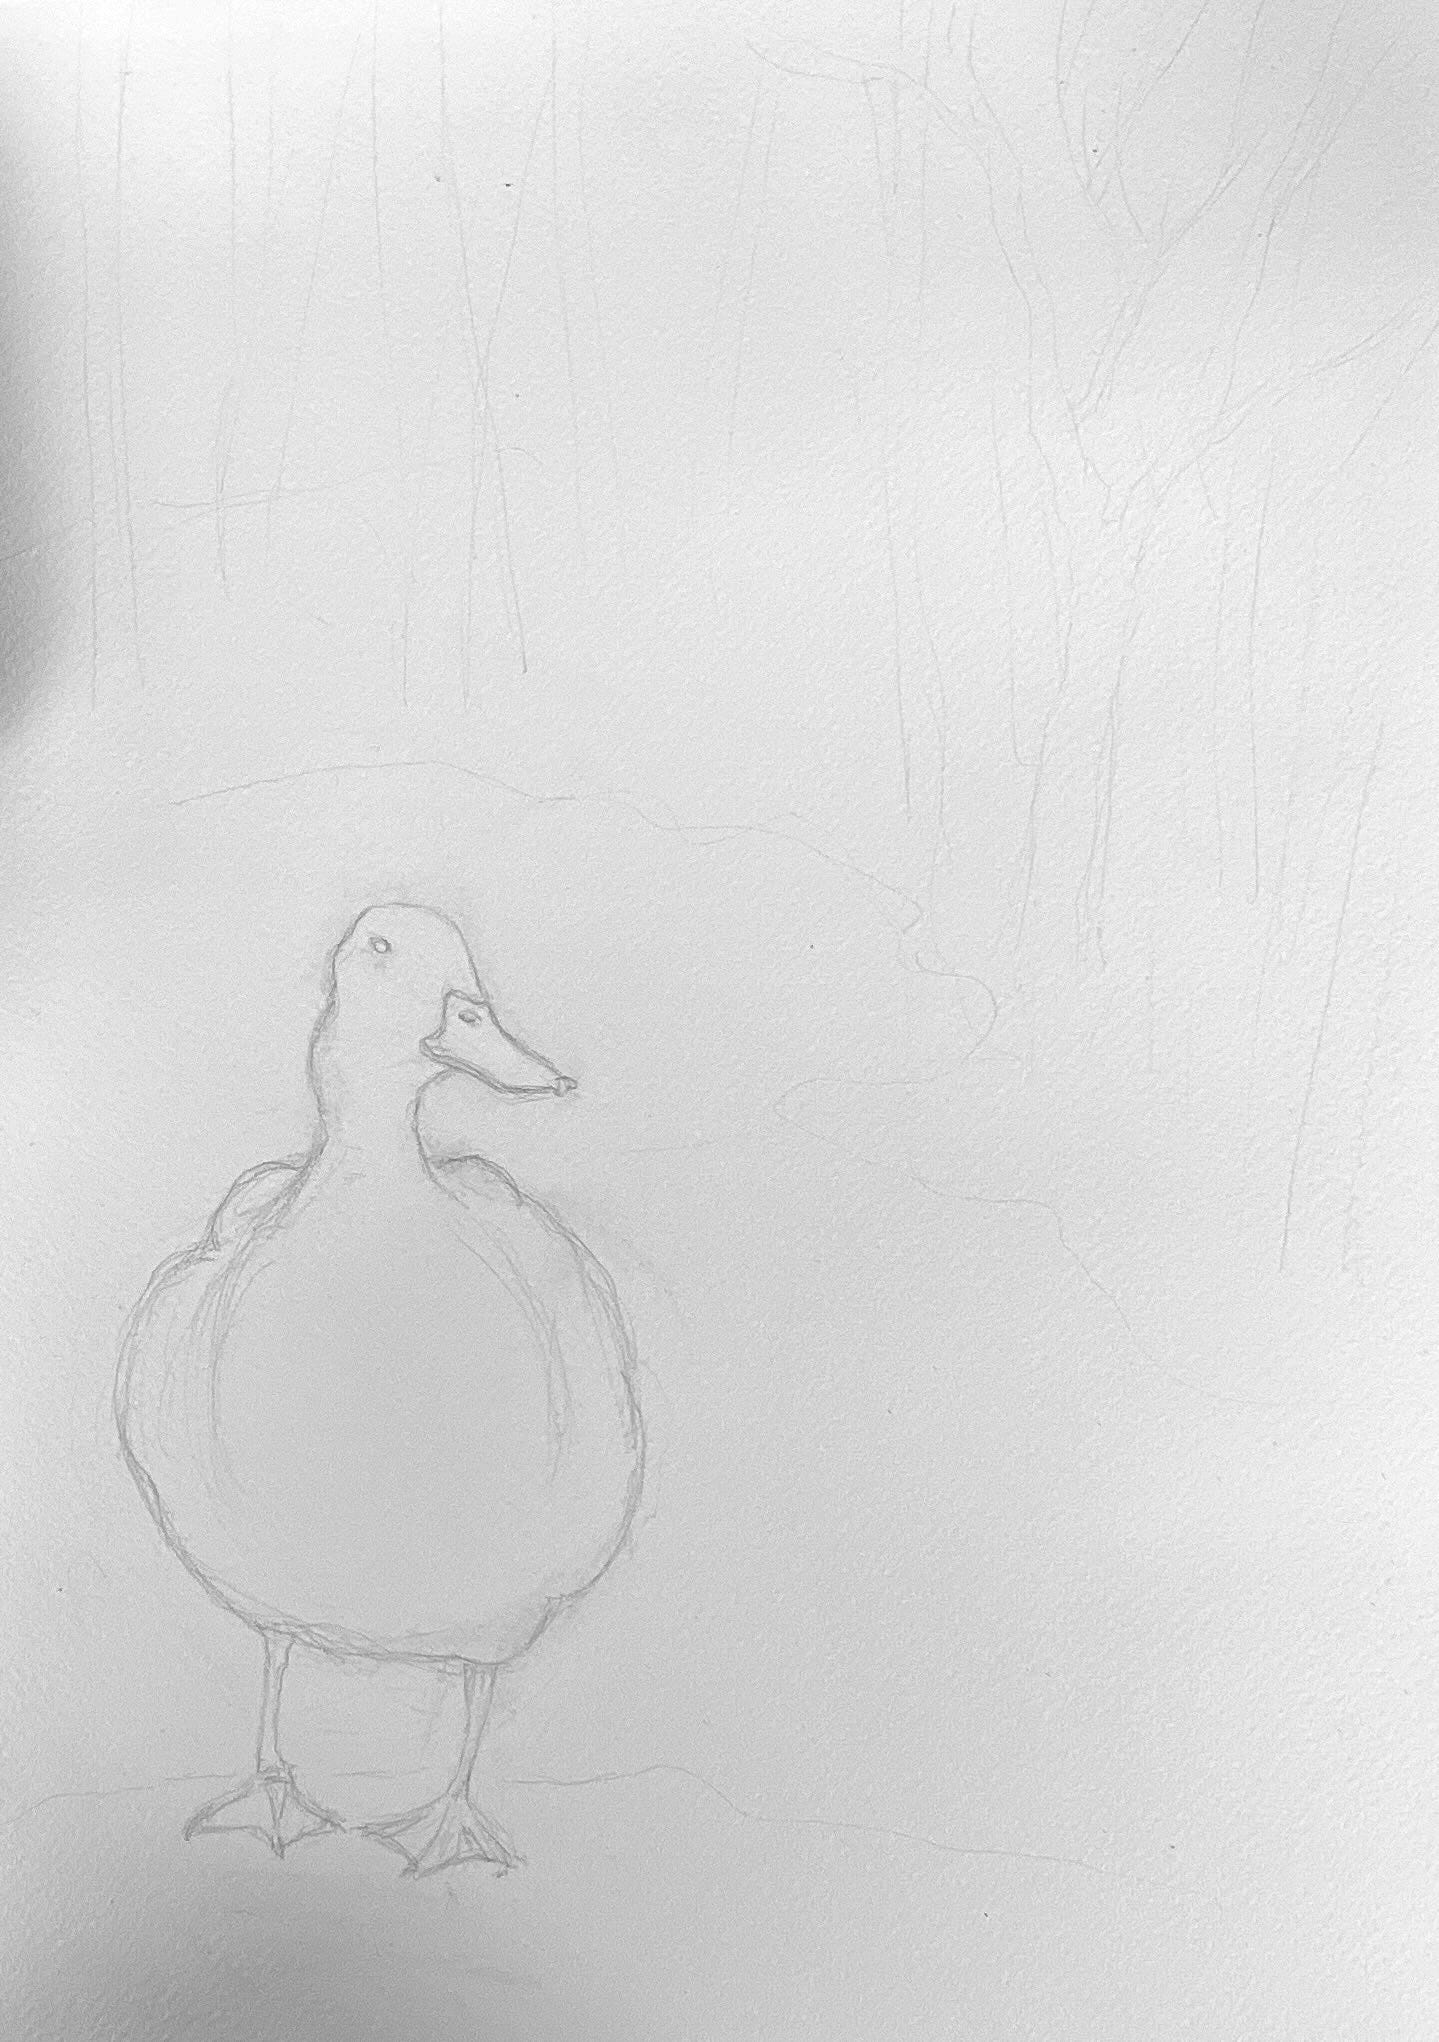
Start by lightly sketching the scene on your watercolor paper with a pencil. Draw the duck in the foreground, focusing on its basic shapes: an oval for the body, a smaller oval for the head, and a triangle for the beak. Add simple lines for the legs and eye. Next, sketch the background—draw a wavy line to represent the edge of the water, and add vertical lines for the trees in the distance. Don’t worry about details at this stage; keep your lines light so they don’t show through the watercolor.
Tip: If you’re not confident with drawing ducks, you can look up a reference photo of a duck to help with proportions. Keep the sketch simple to avoid overcomplicating the painting.
Step 2: Tape Down Your Paper
Secure your watercolor paper to a board using masking tape. This keeps the paper from buckling as you add water and paint. Make sure the tape is placed evenly around all four edges.
Step 3: Wet the Background for a Soft Wash
Using your flat brush, wet the entire background area (everything behind the duck) with clean water. Be careful not to get the duck too wet—you want the background to have a soft, misty look. While the paper is still damp, mix a light wash of Payne’s Gray with a touch of Sap Green. Apply this wash across the background, letting the colors blend naturally on the wet paper. Add more green towards the bottom where the foliage is, and keep the top lighter to suggest a misty sky.
Tip: If the wash looks too dark, lift some color by dabbing with a paper towel while it’s still wet.
Step 4: Paint the Trees and Foliage
Once the background wash is dry, use your medium round brush to paint the trees. Mix a slightly darker shade of Payne’s Gray and Sap Green. Paint thin, vertical strokes for the tree trunks, varying their thickness to create a natural look. Don’t overdo the details—keep them soft to maintain the misty effect. Add some horizontal strokes of Sap Green at the base of the trees to suggest grass or foliage.
Tip: If the trees look too harsh, soften the edges by dipping your brush in clean water and blending the paint outward.
Step 5: Paint the Water
For the water, mix a light wash of Payne’s Gray with a hint of Sap Green. Using your flat brush, apply this wash to the area below the duck, leaving some white patches to suggest reflections or highlights on the water’s surface. Add a few horizontal strokes of Sap Green near the edges to indicate grass or reeds growing by the water.
Tip: Keep the water lighter than the background to create contrast and depth. If it looks too flat, add a few darker strokes of Payne’s Gray near the edges to suggest shadows.
Step 6: Paint the Ground Under the Duck
Mix a light wash of Raw Umber with a touch of Burnt Sienna. Using your medium round brush, paint the rocky ground where the duck is standing. Add some darker strokes of Raw Umber to suggest texture and shadows on the rocks. Keep this area simple so it doesn’t distract from the duck.
Step 7: Paint the Duck’s Body
Now let’s bring the duck to life! Mix a light wash of Burnt Sienna with a bit of Raw Umber for the duck’s body. Using your medium round brush, apply this wash over the duck’s body, leaving the head and underbelly slightly lighter. While the paint is still wet, add a darker mix of Burnt Sienna and Payne’s Gray to the wings and back to create shading. Use short, feathery strokes to suggest the texture of the feathers.
Tip: Work quickly to blend the colors while they’re wet for a soft, natural look. If the paint dries too fast, you can rewet the area with a clean brush and add more color.
Step 8: Paint the Duck’s Head and Beak
For the head, use a lighter mix of Burnt Sienna with a touch of Yellow Ochre. Paint the head, leaving a small white spot for the eye. Add a tiny bit of Payne’s Gray to the top of the head for shading. For the beak, use a small round brush and paint it with a mix of Orange and a touch of Burnt Sienna. Add a small dot of Payne’s Gray for the eye, and a tiny white highlight to make it pop.
Step 9: Paint the Duck’s Legs and Feet
Mix a light wash of Orange with a bit of Burnt Sienna. Using your small round brush, paint the duck’s legs and feet. Add a tiny bit of Payne’s Gray to the sides for shading, giving the legs some dimension.
Step 10: Add Final Details and Adjustments
Step back and look at your painting. Add any final details, like a few darker feather strokes on the duck using a small brush and a mix of Burnt Sienna and Payne’s Gray. If the background looks too flat, you can add a few more tree trunks or foliage. Soften any harsh edges by blending with a clean, damp brush. Once you’re happy with the painting, let it dry completely before removing the masking tape.
Journal Prompts
Adaptability & Movement
Ducks move easily between land, water, and air. Where in my life am I being asked to adapt? Which element (earth, water, air) do I feel most at home in right now—and why?Emotional Grace
Water often symbolizes emotion. Ducks glide over water—how can I navigate my emotional world with more grace and ease?Protection & Nurturing
Ducks are known for fiercely protecting their young. What am I nurturing in my life right now? What parts of myself or my creativity need more protection?Inner Compass
Ducks migrate instinctively, following unseen paths. Where is my inner compass pointing right now, and how can I trust it more fully?Playfulness & Lightness
Ducks often play in water, splashing and diving. What role does play have in my spiritual or creative life? Where can I invite more lightness in?Resilience in the Elements
Ducks are waterproof—they shake off what doesn’t serve them. What do I need to “shake off” emotionally or spiritually right now?Balance of Community and Solitude
Ducks live in flocks but often take solitary moments. How am I balancing community and solitude in my life right now?
I would love to see how this tutorial inspired you! Share your painting, writing, and reflections with us!
In Gratitude,


Share this post